This website may contain affiliate links and advertising so that we can provide recipes to you. Read my privacy policy.
These homemade croissants are a classic French pastry with beautiful flakey tender layers. This labor of love is soft and fluffy on the inside with a buttery flakey crust on the outside.
My favorite part about croissants besides the delicious flavor and texture is that they are so versatile. If you don’t devour them right away, croissants are great to use in many different recipes. Serve with chicken salad sandwiches, use in this Monte Cristo recipe, or in desserts like this bread pudding.

What are Homemade Croissants?
Croissants originated in Austrian and French bakeries and are known for the tender soft layers on the inside. The incredible flavor comes from the dough that has been laminated with butter in multiple layers. The crisp golden outer layer lightly crumbles and simultaneously melts in your mouth!
Nothing beats fresh homemade croissants, and that is why I am so excited for you to make them! My family loves to each these for breakfast, lunch, and dinner! Serve them at your next brunch with this breakfast casserole, and my amazing air fryer bacon and poppyseed fruit salad!
Ingredients for Homemade Croissants
All you need to make homemade croissants are simple everyday ingredients. I love how easy it is to gather all the ingredients and plan for these amazing French rolls. You are definitely going to want to make these very soon!
- Milk: Any milk works, but I prefer 2% or whole milk.
- Instant Yeast: All you need is one packet of instant yeast.
- Granulated Sugar: Just a small amount adds a touch of sweetness.
- Salt: Enhances all the flavors.
- All-Purpose Flour: All-purpose flour produces great rolls.
- Unsalted Butter: Unsalted is best in this recipe.
- Egg: One whole egg is all you need.
- Milk: Mix a little milk with the egg for the egg wash.
How to Make Homemade Croissants
Making these pastries can be intimidating, but I walk you through the process step by step. My instructions and pictures below are so helpful because I wanted you to have detailed help along the way. Follow the recipe card and tips below for everything you need to know before making this recipe.
Prepare the Dough
- Heat the Milk and Add Yeast and Sugar: Heat the milk to 110 degrees Farhenheit-115 degrees Fahrenheit. Add the milk, yeast, and sugar to the bowl of a mixer and stir to dissolve the yeast and sugar.
- Add Salt, Butter, and Flour: Add the salt, butter, and flour in a stand-up mixer and mix with the dough hook attachment until combined.
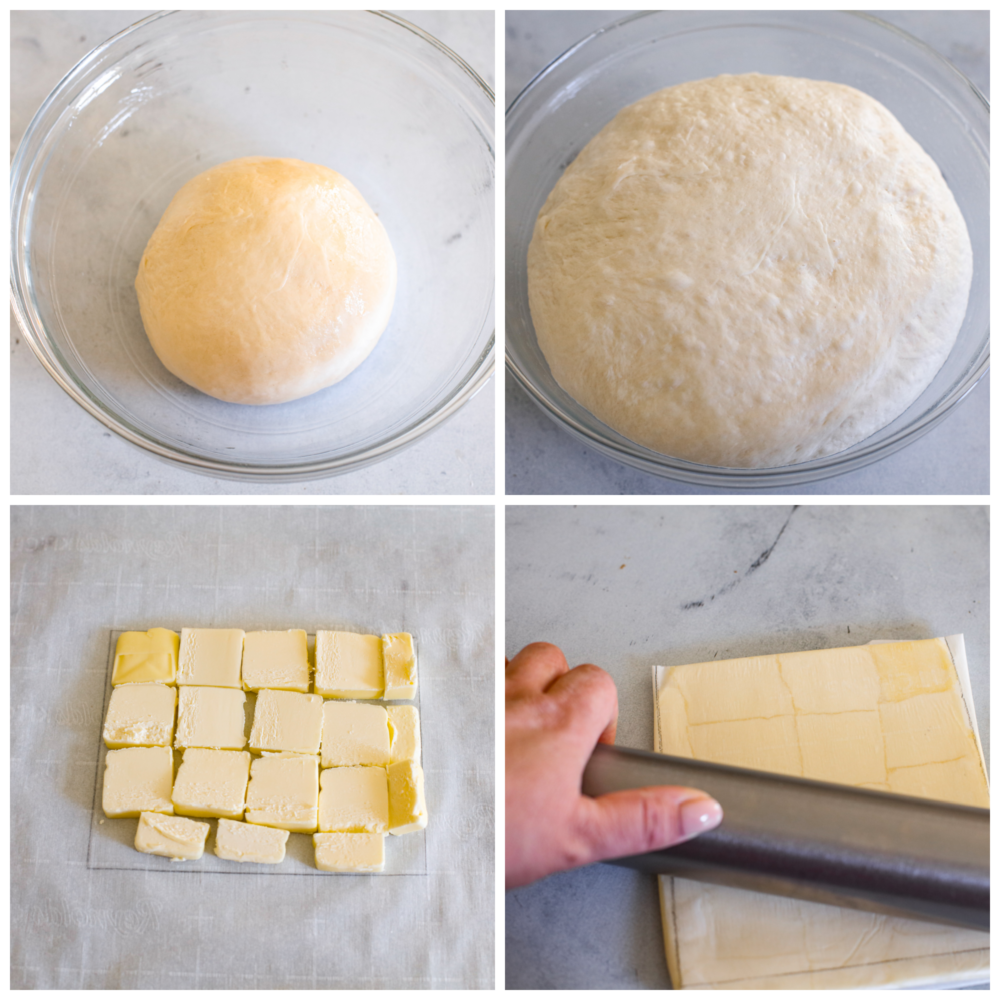
- Mix, Shape, and Rest Dough: Mix on low speed until a smooth dough has formed, about 5-6 minutes. Form into a ball and place in an oiled bowl. Cover and let rise for 1-1 ½ hours.
- Form the Butter Block: Form the butter block by measuring out an 8×6-inch square on a large piece of parchment. Flip the parchment over so the side with the markings won’t touch the butter.
- Slice and Place Butter: Slice the butter into thin slices, then lay them out inside the square. Fold the parchment tightly over the butter.
- Flatten Butter: Use a heavy rolling pin to roll the butter out flat by filling in all the gaps in the square. Be careful not to press too hard and tear the parchment. Try to keep it within the lines of your measured square as best you can.
- Chill the Butter: Place the square of butter in the fridge to chill for 30 minutes while the dough finishes rising.

Laminate the Dough
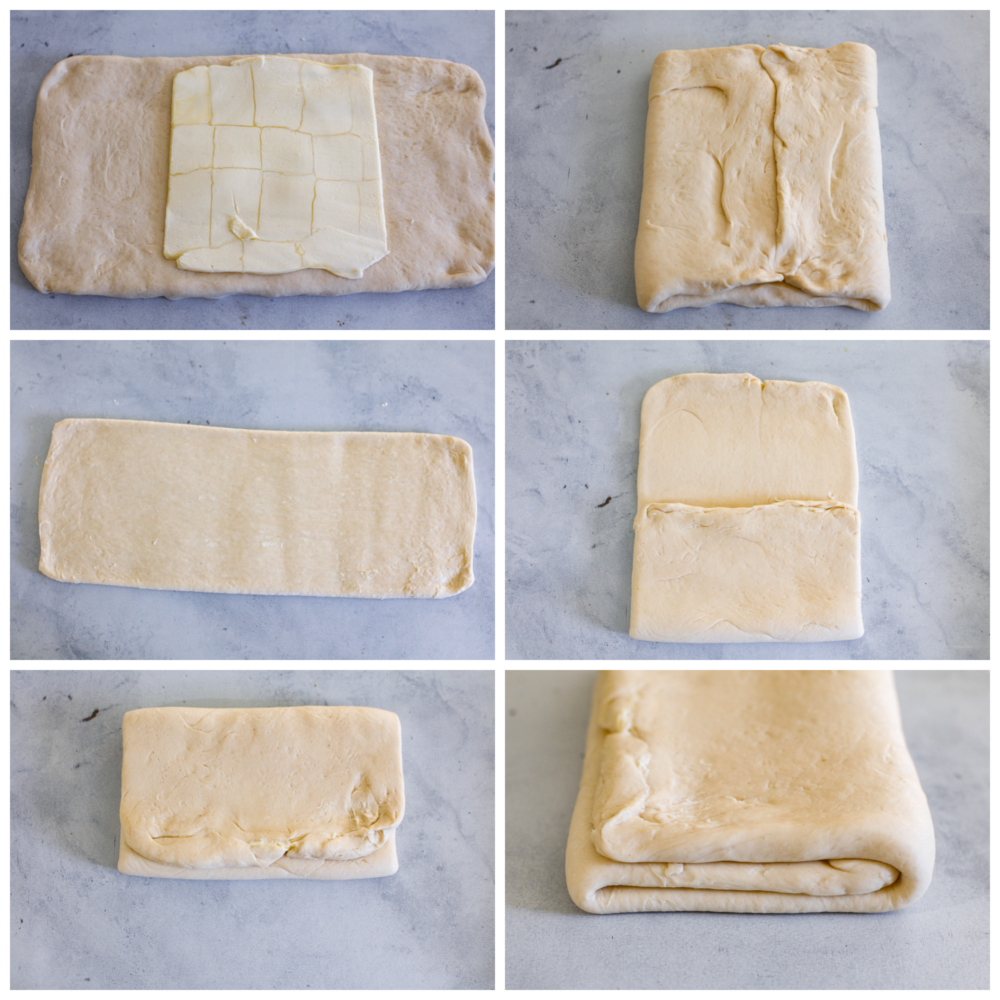
- Place the Butter on the Dough: Once the dough has doubled in size, punch it down and roll it into a rectangle that is 6×14 inches. Place the chilled butter square in the center. Fold both sides of the dough into the center of the butter so they meet in the center. Pinch the seams together.
- Cover and Chill: Cover and chill for 30 minutes.
- Roll Out the Dough: Once the dough has chilled for 30 minutes you will begin the process of chilling and turning. Begin by rolling out the dough in the same direction as the seam down the center of the dough until you have a rectangle that is roughly 18×8. Try to keep it as even as possible with as square of corners as you can. This may require you to stretch the corners to keep them from rounding.
- Fold and Turn the Dough: Fold the dough as you would a letter, which means folding the bottom third up and the top third down over the top. Fold as if you were tri-folding a letter in order to put it inside an envelope. This process is called a turn. In total there will be 4 turns for this dough in order to laminate it.
- Rotate, Fold, Cover and Chill: Rotate the dough so the exposed edges of the letter are facing you. Then roll it out again into the same rectangle, followed by another letter fold. Cover and refrigerate for 1 hour.
- Repeat Steps: Repeat steps 10-12 one more time, except the chill time after those two turns will be 2 hours.

Form and Bake the Croissants
- Roll Out the Dough: Once chilled, with the exposed letter ends facing toward you, roll the dough into a long rectangle that is about 24×8. You want this to be extremely square on the corners, so take the time to use your hands to pull the corners to keep their shape as you roll it out. Try to work fairly quickly though, as the dough will warm up the longer you take. If you want extra sharp edges, use a very sharp pizza cutter to trim about ¼ inch off the edges.
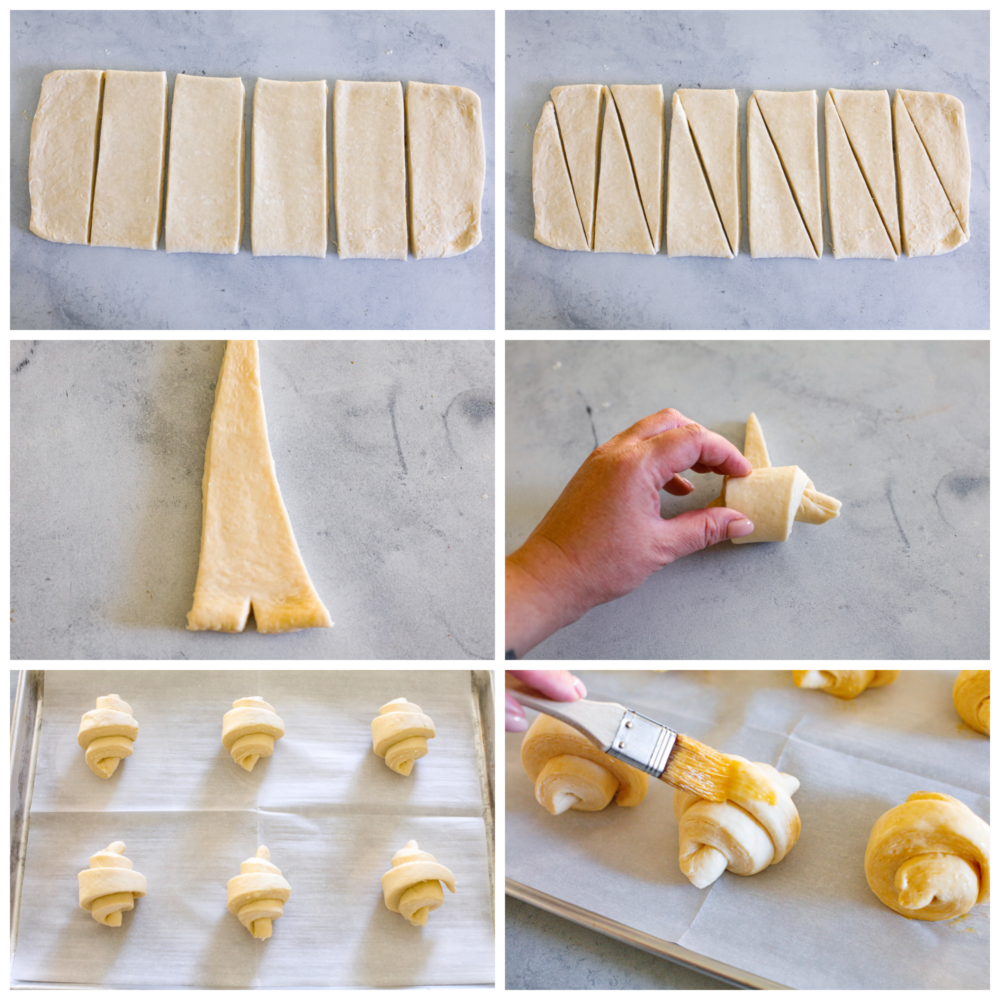
- Cut Sections and Diagonal Shapes: Using a sharp knife or pizza cutter, cut the dough into six equal sections that are 8×4 inches, then cut each of those along the diagonal.
- Cut a Slit and Roll the Dough: Cut a ½ inch slit in the center of the long end and roll up until the point of the dough. Tuck the point under the roll. Line a baking sheet with parchment paper and place 6-8 rolls on the pan.
- Cover and Rise: Cover with plastic wrap or clean kitchen towels then let rise for 2-2 ½ hours.
- Egg Wash the Dough: When the croissants are done proofing, preheat the oven to 400 ℉arhenheit. Make the egg wash by combining the egg and 2 tablespoons of milk together with a fork. Use a pastry brush to brush across the tops of the croissants. Let sit for 5 minutes or so to dry before brushing with a second coat of egg wash.
- Bake: Bake one sheet at a time for 15 minutes at 400° Fahrenheit then lower the temperature and bake for an additional 13-15 minutes. Bake until the croissants are a deep golden brown.
- Cool and Enjoy: Let cool for 20 minutes before serving.

Baking Tips
I know there are a lot of steps in this recipe, but I am here for you the whole way through! I also have some helpful tips to make this recipe even more of a success. All the hard work will be worth every bite!
- Don’t Overheat the Milk: Be sure not to overheat the milk when adding the yeast. If the milk is too hot it can kill the yeast and prevent the dough from rising.
- Don’t Over-Chill the Butter: Don’t over-chill the butter block! If it is chilled for more than 30 minutes, the butter won’t be pliable enough to spread as the dough is rolled out. If you end up chilling it longer than 30 minutes, pull it out and let it sit at room temperature for 15 minutes before continuing.
- Room Temperature Can Vary: If your kitchen is extra warm while the croissants are proofing, the process may be faster than 2-2 ½ hours and you will want to make sure no butter is melting out the sides of your croissants. If the kitchen is on the cooler side, proofing may take a little longer but they will get there!
Making the Perfect Dough:
- Make Sure the Dough is Chilled: If at any point you find the dough is shrinking and not holding its shape when you’re rolling it, wrap it up and let it rest in the fridge for 30 minutes. Shrinking indicates the dough is being overworked and needs time to rest before being worked again.
- Square the Dough: Keep the dough as square as possible. The more rounded it becomes during the lamination process, the more uneven it will be.
- Flour to Prevent Sticking: As the lamination process progresses, spots of dough may bubble and expose the butter beneath. Simply dust with flour to prevent sticking and continue with the process.

Storing and Freezing
This recipe is perfect for making ahead of time! All good food is time-consuming but definitely worth it. I like to make these a couple of weeks before the holidays to cut back on time. I make the dough when I have time, and freeze the dough until I’m ready to bake them fresh.
- On the Counter: Store baked croissants in an airtight container for 3-4 days, though they are best when eaten the day they are baked.
- In the Freezer: They can be frozen when the dough has been formed into croissants but has not yet been proofed. Cover with plastic wrap and freeze for 2 hours before removing from the baking sheet. Place croissants in a freezer plastic bag then seal tightly.
- Bake Thawed Croissants: When ready to bake, remove from the freezer and place on a parchment-lined baking sheet. Cover and let sit at room temperature for 4-5 hours, so they thaw and proof. Continue with the baking instructions from step 5 of the baking process.

Prepare the dough
-
Heat the milk to 110° Farhenheit-115° Farhenheit. Add the milk, yeast, and sugar to the bowl of a mixer and stir to dissolve the yeast and sugar.
-
Add the salt, butter, and flour and mix with the dough hook attachment until combined.
-
Mix on low speed until a smooth dough has formed, about 5-6 minutes. Form into a ball and place in an oiled bowl. Cover and let rise for 1-1 ½ hours.
-
Form the butter block by measuring out an 8×6 inch square on a large piece of parchment. Flip the parchment over so the side with the markings won’t touch the butter.
-
Slice the butter into thin slices and lay them out inside the square until it is mostly full, then fold the parchment tightly over the butter.
-
Use a heavy rolling pin to roll the butter out flat, filling in all the gaps in the square. Be careful not to press too hard and tear the parchment. Try to keep it within the lines of your measured square as best you can.
-
Place the square of butter in the fridge to chill for 30 minutes while the dough finishes rising.
Laminate the dough
-
Once the dough has doubled in size, punch it down and roll into a rectangle that is 6×14 inches. Place the chilled butter square in the center and fold both sides of the dough into the center of the butter so they meet in the center. Pinch the seams together.
-
Cover and chill for 30 minutes.
-
Once the dough has chilled for 30 minutes you will begin the process of chilling and turning. Begin by rolling out the dough in the same direction as the seam down the center of the dough until you have a rectangle that is roughly 18×8. Try to keep it as even as possible with as square of corners as you can, which may require you to stretch the corners to keep them from rounding.
-
Fold the dough as you would a letter, which means to fold the bottom third up and the top third down over the top, as if you were tri-folding a letter in order to put inside an envelope. This is called a turn. In total there will be 4 turns for this dough in order to laminate it.
-
Rotate the dough so the exposed edges of the letter are facing you and roll out again into the same rectangle, followed by another letter fold. Cover and refrigerate for 1 hour.
-
Repeat steps 10-12 one more time, except the chill time after those two turns will be 2 hours.
Form and bake the croissants
-
Once chilled, with the exposed letter ends facing toward you, roll the dough into a long rectangle that is about 24×8. You want this to be extremely square on the corners, so take the time to use your hands to pull the corners to keep their shape as you roll it out. Try to work fairly quickly though, as the dough will warm up the longer you take. If you want extra sharp edges, use a very sharp pizza cutter to trim about ¼ inch off the edges.
-
Using a sharp knife or pizza cutter, cut the dough into six equal sections that are 8×4 inches and then cut each of those along the diagonal.
-
Cut a ½ inch slit in the center of the long end and roll up until the point of the dough, being sure the point is tucked under. Place on a parchment lined baking sheet, 6-8 on a pan.
-
Once all the triangles of dough are formed into croissants, cover them with plastic wrap or clean kitchen towels and let rise for 2-2 ½ hours. They should be nice and puffy with a little bit of a jiggle to them when they are ready.
-
When the croissants are done proofing, preheat the oven to 400° Fahrenheit. Make the egg wash by combining the egg and 2 tablespoons of milk together with a fork. Use a pastry brush to brush across the tops of the croissants. Let sit for 5 minutes or so to dry before brushing with a second coat of egg wash.
-
Bake one sheet at a time for 15 minutes at 400° Fahrenheit then lower the temperature and bake for an additional 13-15 minutes. Bake until the croissants are a deep golden brown.
-
Let cool for 20 minutes before serving.
Serves: 12
Serving1rollCalories221kcal (11%)Carbohydrates26g (9%)Protein5g (10%)Fat11g (17%)Saturated Fat7g (35%)Polyunsaturated Fat1gMonounsaturated Fat3gTrans Fat0.4gCholesterol42mg (14%)Sodium210mg (9%)Potassium76mg (2%)Fiber1g (4%)Sugar2g (2%)Vitamin A351IU (7%)Calcium38mg (4%)Iron2mg (11%)
All nutritional information is based on third party calculations and is only an estimate. Each recipe and nutritional value will vary depending on the brands you use, measuring methods and portion sizes per household.

